A beautiful smile can make you confident and give you an impressive look. It is now easier with Invisalign. Unlike traditional metal braces, Invisalign uses clear, removable aligners to straighten teeth. Knowing what to expect is important if you are considering starting Invisalign. So, how does the Invisalign treatment process work?
Our blog post will walk you through each step, from your first visit to the final results. You will see how Invisalign combines modern technology with personalized care to give you the smile you have always wanted.
Let us know about Invisalign and how this simple and convenient treatment can help transform your smile.
What is the Invisalign Treatment Process?
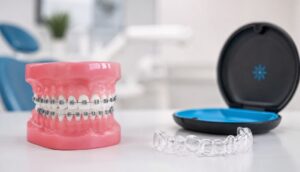
Invisalign is a teeth-straightening treatment that uses clear aligners instead of metal braces. These aligners are custom-made to fit your teeth, and you can gently move them into the right position over time. You wear each set of aligners for about 1-2 weeks, for 20-22 hours daily, only removing them to eat, drink, brush, and floss.

The aligners are made from a smooth, flexible plastic that is comfortable and nearly invisible. Depending on your needs, the treatment can take several months to a year or more, giving you a straighter, healthier smile without the trouble of traditional braces.
The complete Invisalign Treatment Process consists of the following main steps;
Step 1: Initial Consultation
The Invisalign process begins with a visit to an orthodontist or dentist who offers Invisalign. During this appointment,
- They will check your teeth and gums to see if Invisalign is right for you.
- You will talk about what you want to achieve with your smile.
- The doctor can take X-rays or photos of your teeth to plan your treatment.
In short, this step gives you a chance to ask questions like how long the treatment will take, what your teeth will look like afterward, and how much it will cost so that you can get an idea of how the process works.
Remember, this visit is often free or low-cost, so it is a risk-free way to explore your options.
Step 2: Customized Treatment Plan
If Invisalign is a good fit for you, the next step is creating a customized treatment plan. The orthodontist will use a 3D scanner or take impressions of your teeth to create a digital model. This technology allows them to map out the exact movements your teeth will take throughout the treatment.
Not only will you get to see what your new smile will look like, but you will even get to see an actual virtual preview before your new smile is ready. This is a very in-depth plan to ensure your aligners will fit your teeth and work properly.
Step 3: Making Your Aligners
Once the treatment plan is finished, your orthodontist will create custom aligners. These aligners are BPA-free, which means they are safe and comfortable to wear. Each aligner is slightly different so that you can move your teeth gradually.
It depends on your case; you may need a few aligners to a few dozen. Each aligner will need to be worn for about one to two weeks before stepping onto the next one in the series.
Step 4: Wearing Your Aligners
At that time (when you get your first set of aligners), you will wear the aligners for 20 to 22 hours a day. Only take them out when you need them. It is important to have that consistent wear to get the best results. The aligners are removable, and you can eat the food you love.
Cleaning them is simple. You can rinse them with lukewarm water and brush them gently with a soft toothbrush. Initially, you may feel some pressure or discomfort as your teeth shift, which tends to go away after a few days.
Step 5: Regular Check-ups with Your Orthodontist
You will have regular check-ups with your orthodontist throughout your Invisalign treatment process, usually every six to eight weeks. During these visits, your doctor will check how your teeth are moving and give you the next set of aligners.
In these appointments, you can comfortably address any issues or make adjustments to your treatment plan if needed. Staying on track with these visits ensures that your treatment progresses as planned.
Step 6: Completing Your Treatment
Your active Invisalign treatment process is complete once you have gone through all your aligners and your teeth have reached their desired positions. However, your orthodontist may recommend a retainer to maintain your results.
A retainer is a custom-made device that keeps your teeth from shifting back to their original positions. It is similar to an aligner and can be removable or fixed to the back of your teeth. Initially, you will wear it all the time, but over time, you may only need to wear it at night.
Why Choose Invisalign?

Today, Invisalign holds a 6% share of orthodontic care for teens and an impressive 31% for adults.This percentage is increasing day by day. It is all due to these benefits;
- The aligners are clear, so they are hard to notice.
- The smooth plastic is gentle on your mouth, unlike metal braces.
- You can take them out at special events or photos.
- Each aligner is made just for you, ensuring effective treatment.
Is Invisalign Right for You?
While Invisalign is effective for many people, it is not the right solution for everyone. It works best for mild to moderate alignment issues like gaps, crowded teeth, or minor bite problems. More complex cases may still require traditional braces.
It is also important to wear the aligners according to your orthodontist’s instructions because skipping wear time can delay your progress.
Wrapping Up!
Invisalign is a modern way to get a radiant smile. By properly following the steps of the Invisalign treatment process, you can enjoy wonderful results in a matter of months. If you are ready to start this process, schedule a consultation with a qualified orthodontist at some well-reputed clinic like DKOsmiles right now. Be satisfied because, with Invisalign, your dream smile is closer than ever.
Dietrich Kelso Team
Dietrich & Kelso Orthodontics provides advanced orthodontic care with Invisalign and ceramic braces to help patients achieve healthy, confident smiles. We specialize in modern teeth straightening solutions for kids, teens, and adults, with a focus on comfort, precision, and long-lasting results.
Book a Free Consult